
LearningLibsguides for teachers
Log in to LearningLib
If you are employed at a subject, research or educational library, you can get a user login for LearningLib.
You log in or register as a user by going to the log-in page and filling in the form under ’Sign up’.
Here you must read and accept the site's rules, and confirm that the objects you publish comply with current GDPR rules, and that all content relating to the object is copyright-cleared for free sharing on the internet under a CC-BY-NC licence.
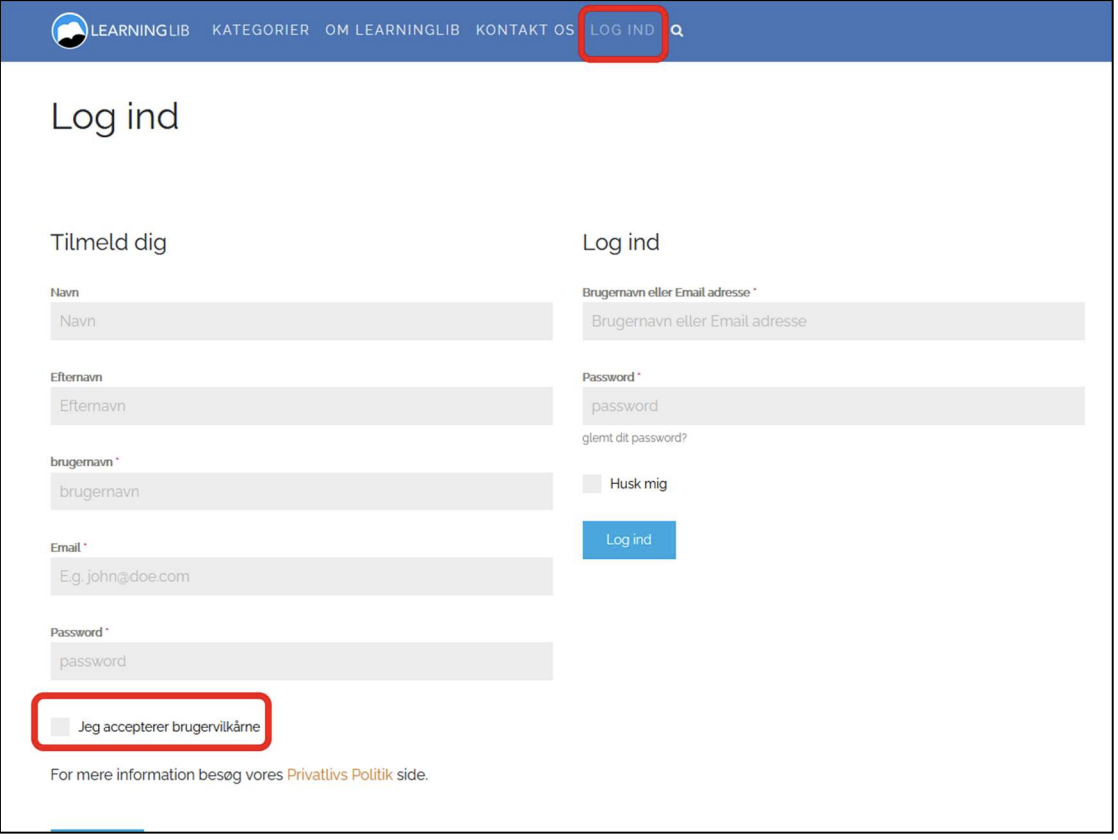
If you would like to be registered straight away, you can then send an email to asge@kb.dk, and you will be registered and contacted by an administrator as soon as possible.
Start a learning object
After logging in you get an extra WordPress menu at the bottom of the LearningLib page.
Click the WordPress logo in the bottom left corner.
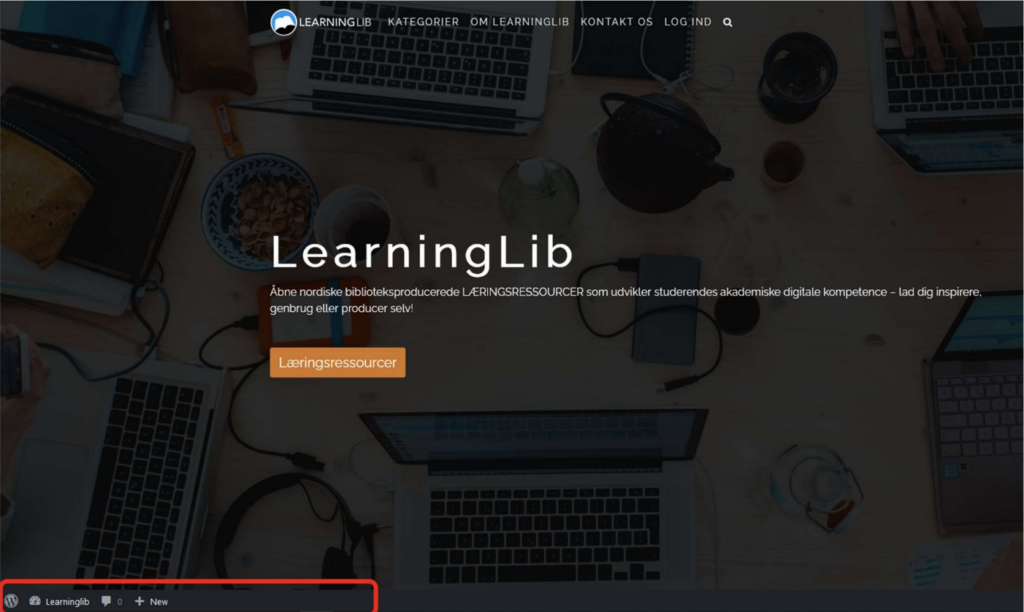
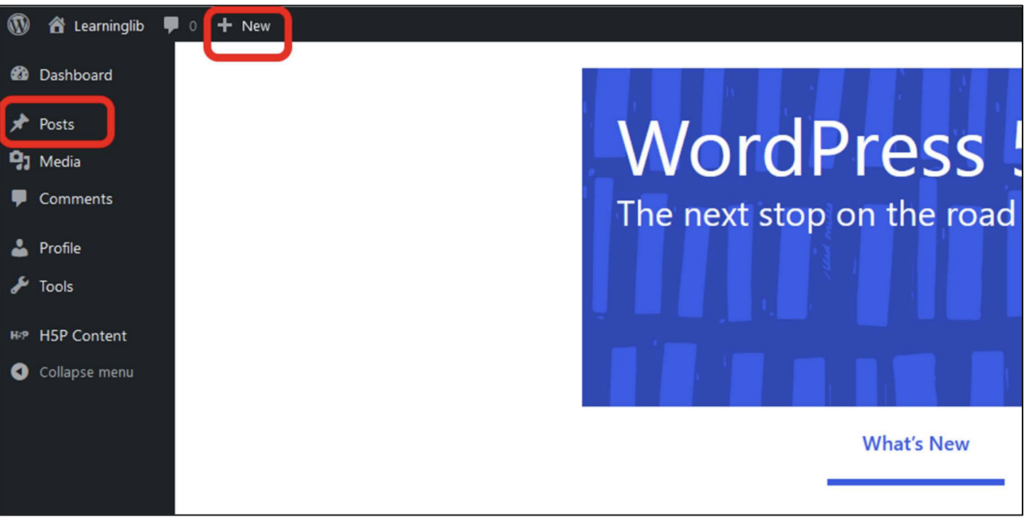
Now you come to the WordPress platform, where you can create, edit and delete your objects.
To make a new object, clickNew
To see existing objects and edit them, choosePosts
If you choose here to copy an existing learning object that has a CC-BY-NC licence, remember to credit the authors.
Be careful not to edit the original but your own copy.
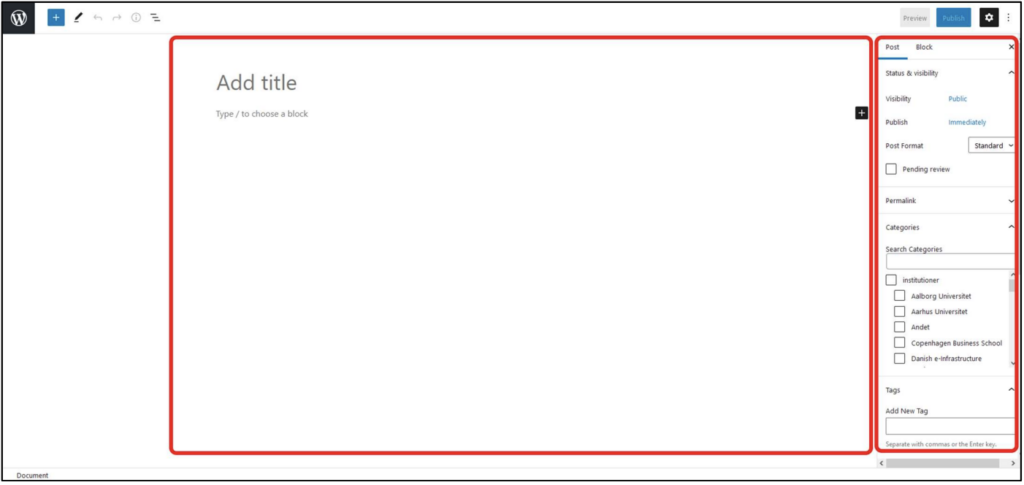
WordPress’ block editor
When you have created a new learning object, you get an empty page that has to be built up. In WordPress, pages are built from horizontal blocks that you can add and fill with content. You do this in the main part of the page (centre-left).
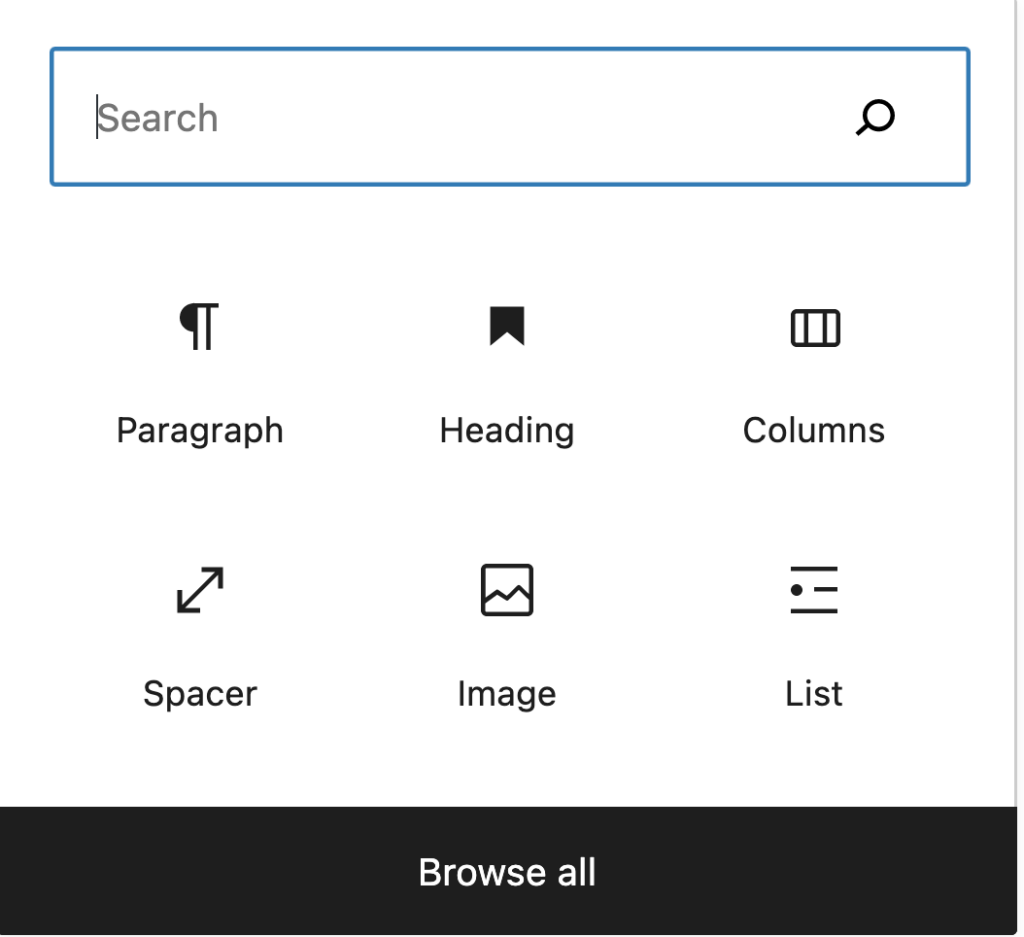
When you hold the mouse over a gap, a plus appears which you click to add a block, e.g. a heading (Heading), text block (Paragraph) or image (Image). Do play with the options and take inspiration from other LearningLib objects.
If you go into other people's objects under Posts, be careful not to change the original. You are welcome to copy posts and work on in the copy.
On WordPress.com there are descriptions of all block types:
https://wordpress.com/support/wordpress-editor/blocks/
We have also produced a template consisting of some blocks that you can use as a starting point: “Guide: Learning resource template“.
In the panel on the right you can decide the object's visibility and which metadata values it should have. This is so that the objects can be found under a topic, a specific institution, language, etc.
Title, intro text and featured image
- Place the mouse in the title field and give your object a title.
Further content is added via different types of blocks.
Each new block is added via the plus +
You can delete blocks again or move them up or down the page.
You can browse through the different block types, or you can do a text search.
The very first block will usually be LearningLib’s basic intro block, which is called ’Post intro’.
When you make a completely new object, a post intro block is automatically placed at the top of the page.
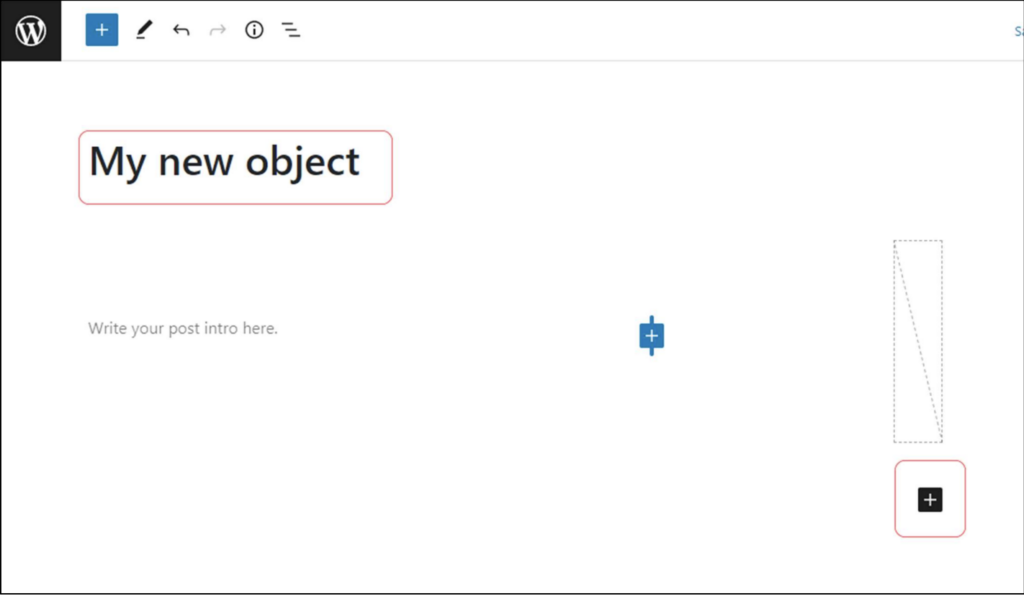
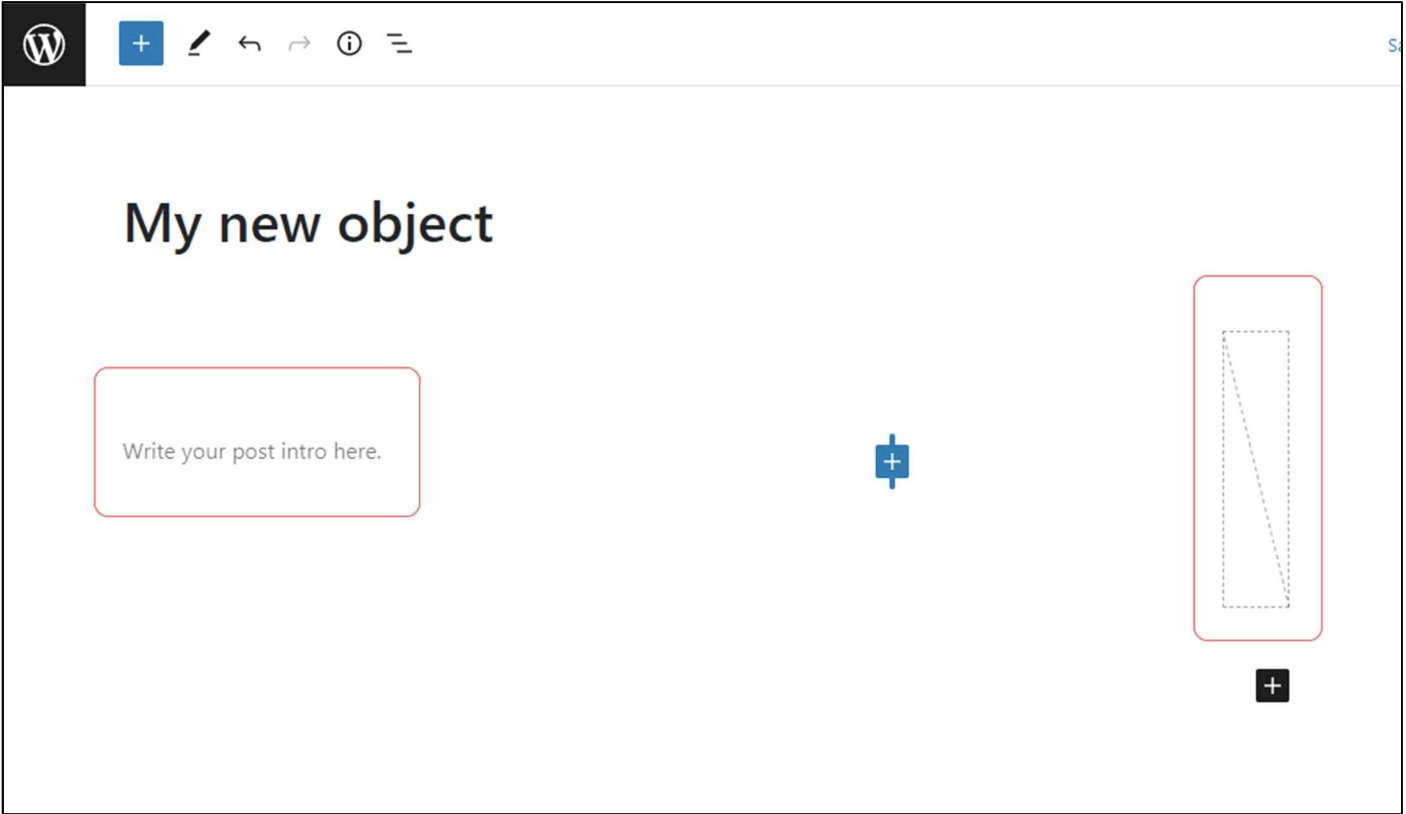
Here you can write an intro text (on the left) and choose a featured image (on the right).
The intro text and the featured image are shown on the object page and in the overview view of objects.
The featured image can be added by activating the vertical box on the right. Click theblue arrow.
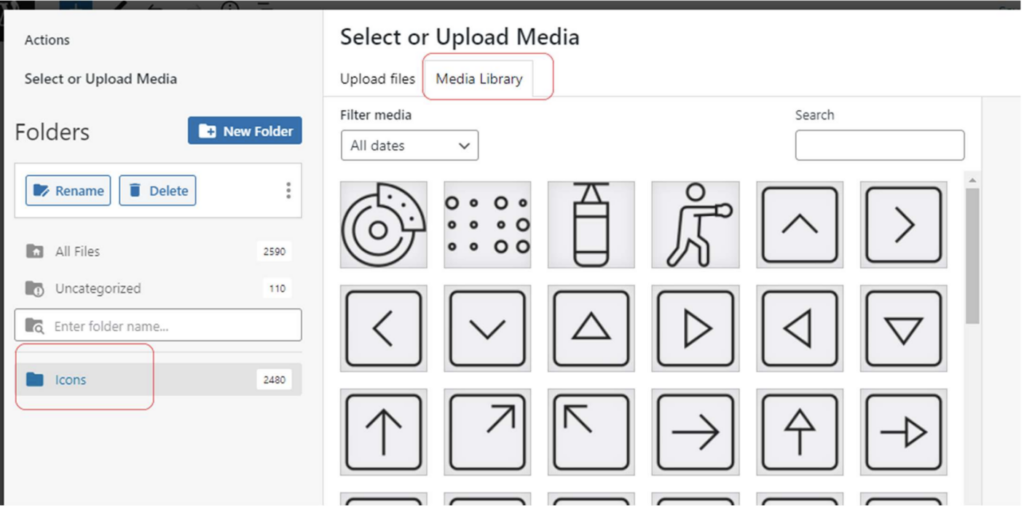
Choose Media Library > Icons and choose an icon.
Remember to add a description and ALT text to the icon in the media library, so that the page meets requirements for accessibility and machine readability.
Add text
A text field is called ’Paragraph’ in WordPress.
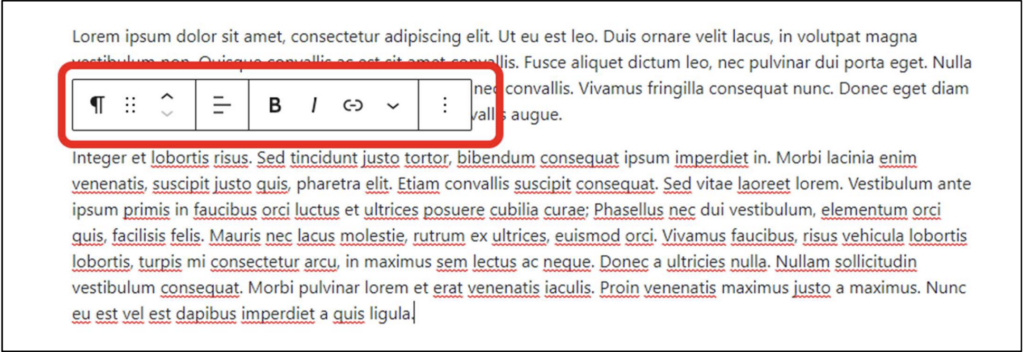
When you have added a Paragraph, you can start typing or pasting text directly into it.
You will then see a toolbar above the text. Here you can, among other things, choose bold, italics, insert a link and so on.
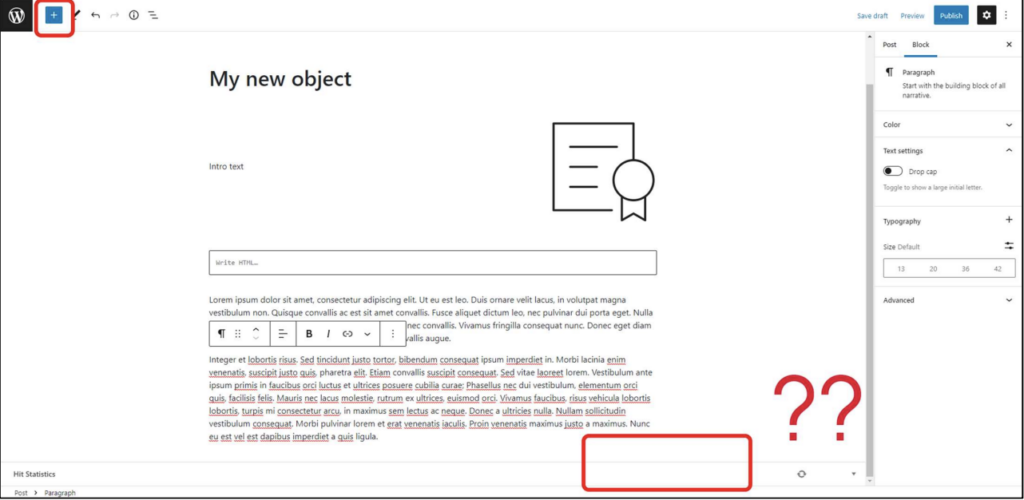
If you find that the black plus for making more blocks disappears, you can always add a block after the current block by using the blue plus at the top of the page.
More information about the paragraph block type can be found here: https://wordpress.com/support/wordpress-editor/blocks/paragraph-block/
Add images
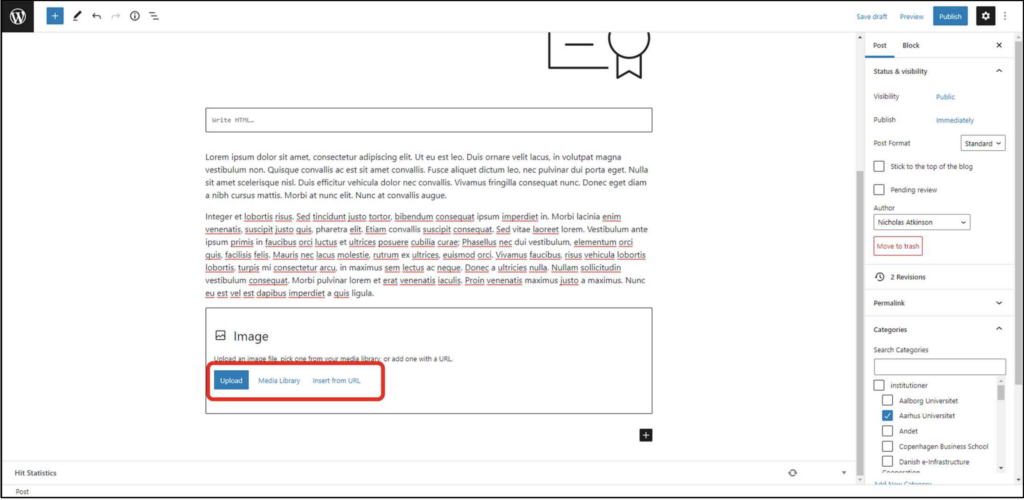
Choose the ’Image’ block type.
Here you can Upload a (copyright-cleared) image from your PC, browse LearningLib’sMedia Library or add an image from the internet via Insert from URL.
Remember to add the source, a description and ALT text to the image in the media library. This is in order to meet requirements for accessibility and machine readability.
Find more information about the image block type here: https://wordpress.com/support/wordpresseditor/blocks/image-block/
Good, free images from Unsplash that you can download and use for any project.
Good icons that are easy to get hold of and use
Free icons, small images and stickers from FlatIcon for your projects.
Burst is a free image library run by Shopify. The image library contains thousands of royalty-free, high-resolution images with easy access.
Add video
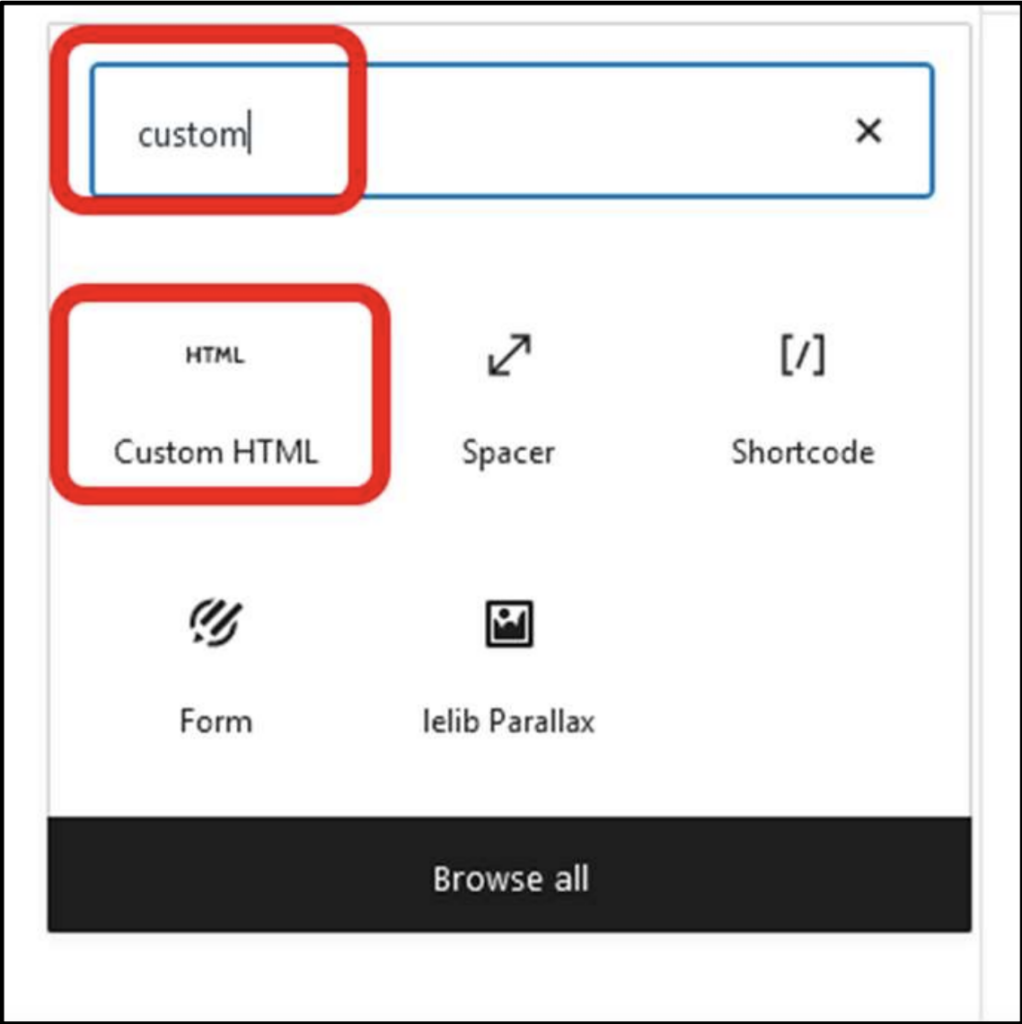
When you want to embed a video or other media types from another site you can use embed or Custom html block types. If you choose embed, you must insert (only) one link/URL, and if it can be approved, the video will be shown on the page.
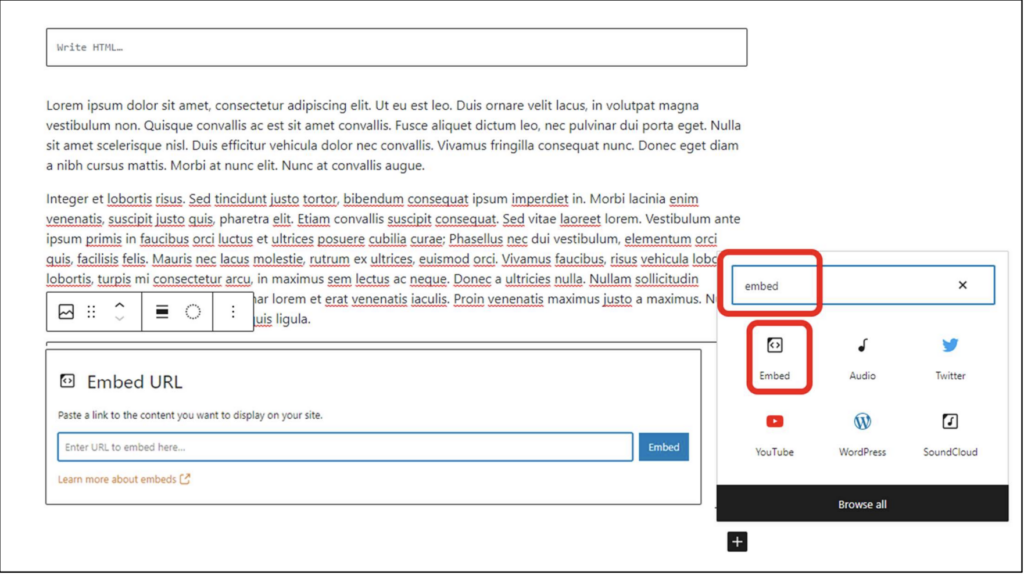
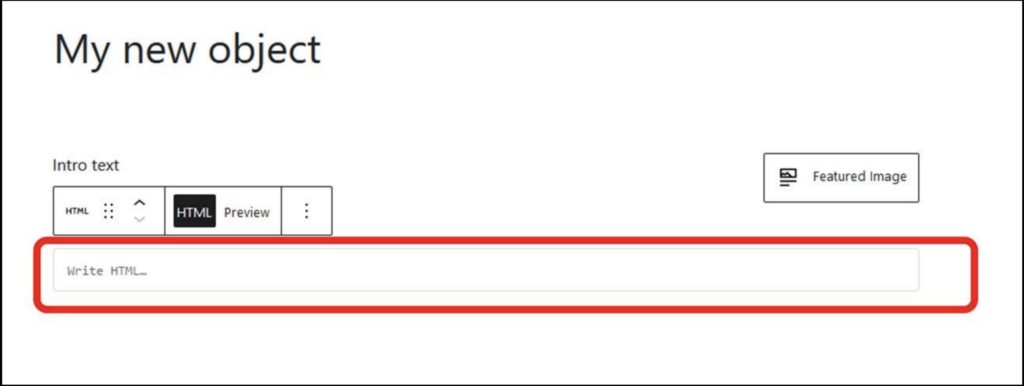
If you instead want to use an embed code or other forms of html code containing the media, it is better to use the Custom html block type.
With it you can insert a whole section of html code.
See an example of how to embed a video here:
More information about the Custom html block type can be found here : https://wordpress.com/support/wordpress-editor/blocks/custom-html-block/
More information about the embed block type can be found here:
https://wordpress.com/support/wordpress-editor/blocks/embed-block/
Remember to add subtitles to your videos so that they can be read by machine readers.
Footer
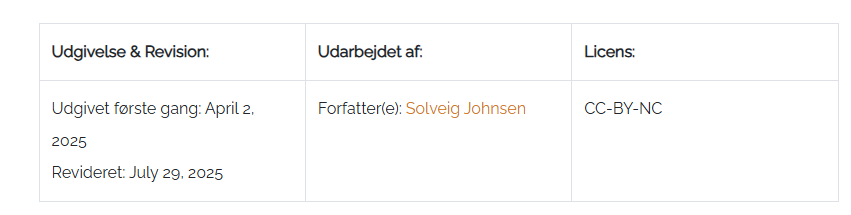
A footer is automatically added at the bottom of the object with its authors, date and CC licence.
If you want to publish under a CC-BY-NC, you do not have to do anything. If you want to publish under a different licence, it must be added under tags. It will then be added to the footer.
Authors are added to the footer when they are linked to the learning resource on the right-hand side. If your co-authors are not registered in LearningLib, they can register here. They can then be linked.
Publish object
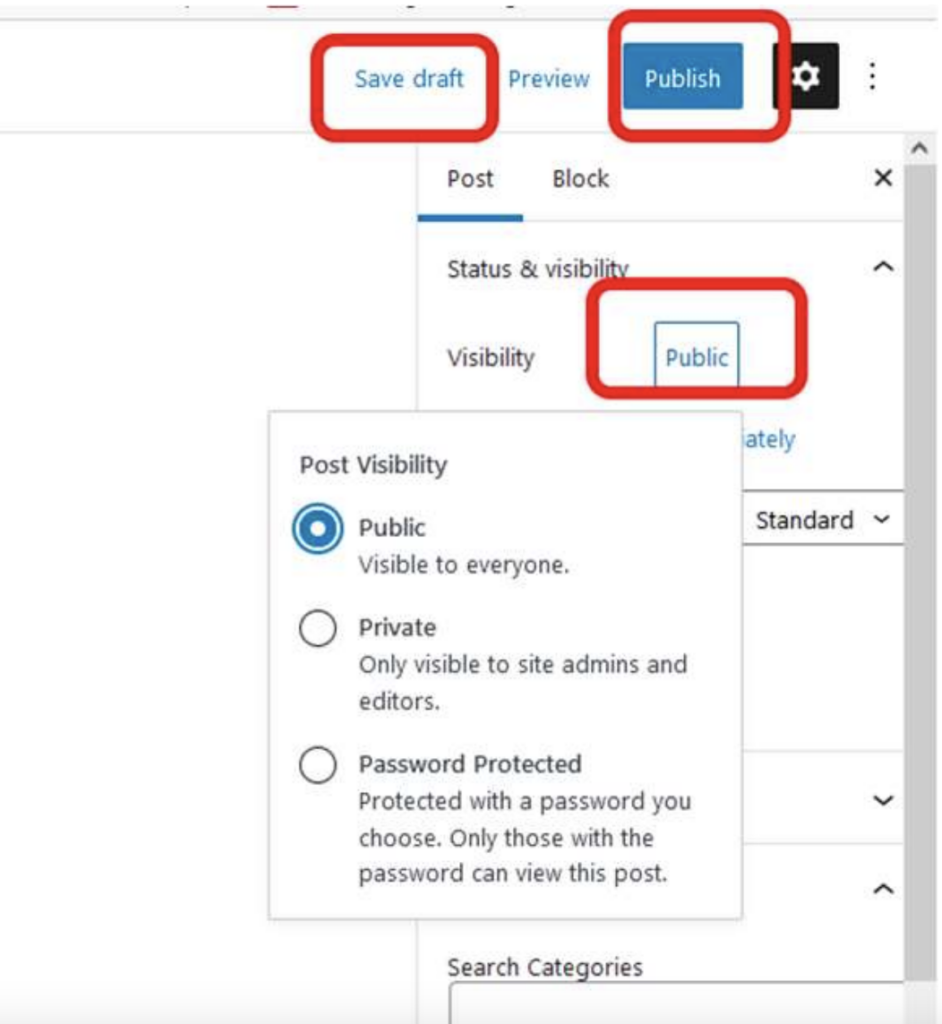
You can save the object as a draft (Save draft), until you are ready to publish it, or you can choose Publish, which will publish it immediately.
Under Status & Visibility you can also
choose to make the object visible only to those who have the link and password for it.
When you are working in a draft, your learning object looks slightly different in Preview, than if it is
published. It can therefore sometimes be an advantage to set the status to Private and then publish
the learning object.
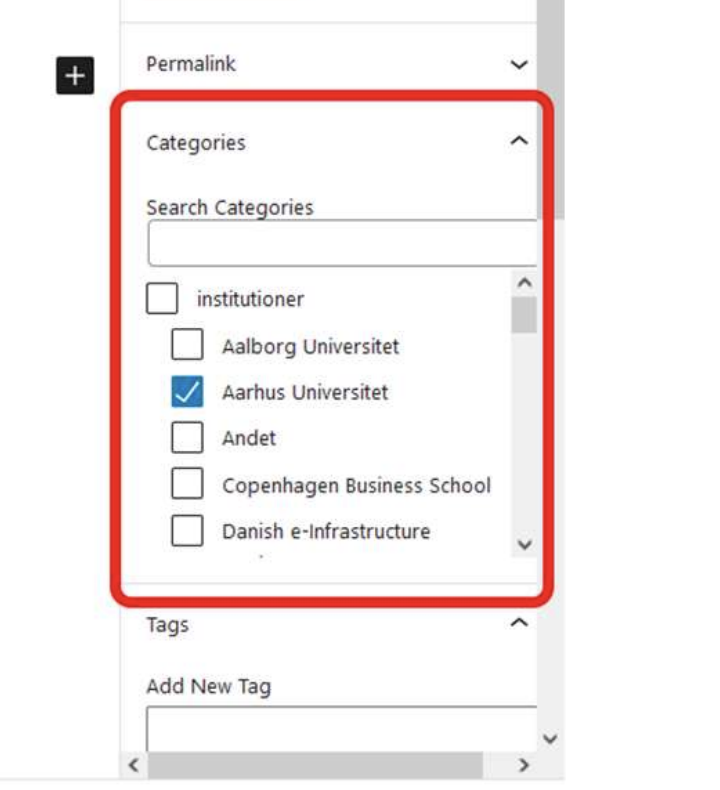
Under the ’Categories’ section are all the metadata tags you can give your object; category, institution,
level and language.
Here we have selected an institution
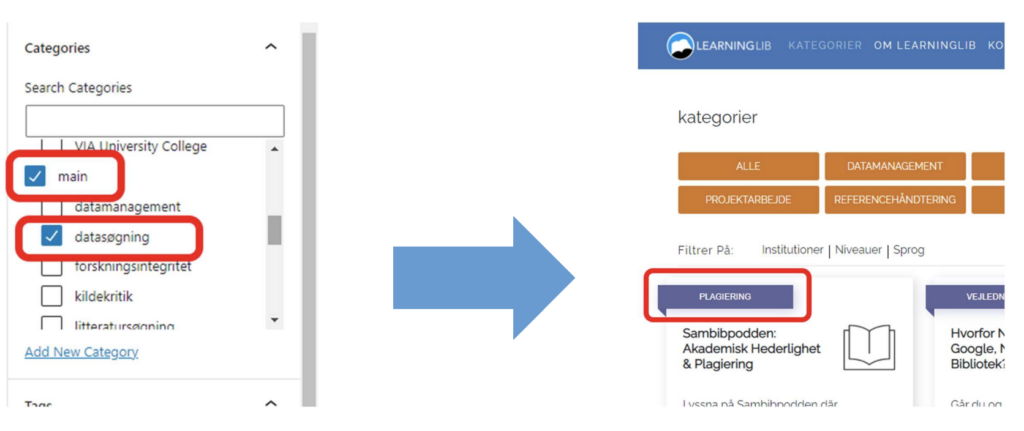
And here we have selected a category.
Note, that for the categories listed under Main it is also necessary to tick the
overall box, i.e.Main. Without it you will not get a blue banner on the post:
H5P content
When you want to add particular content types that do not exist in the WordPress blocks (such as a quiz), you can make an H5P object which can then be added to your learning object as html code.
In the left menu of the WordPress interface you will find H5P.
ClickContent -> Add New.
Here you can see a list of H5P content types that can be used in your objects. The most
used isQuiz (Question Set). It is an H5P element that contains several of the other H5P content types.
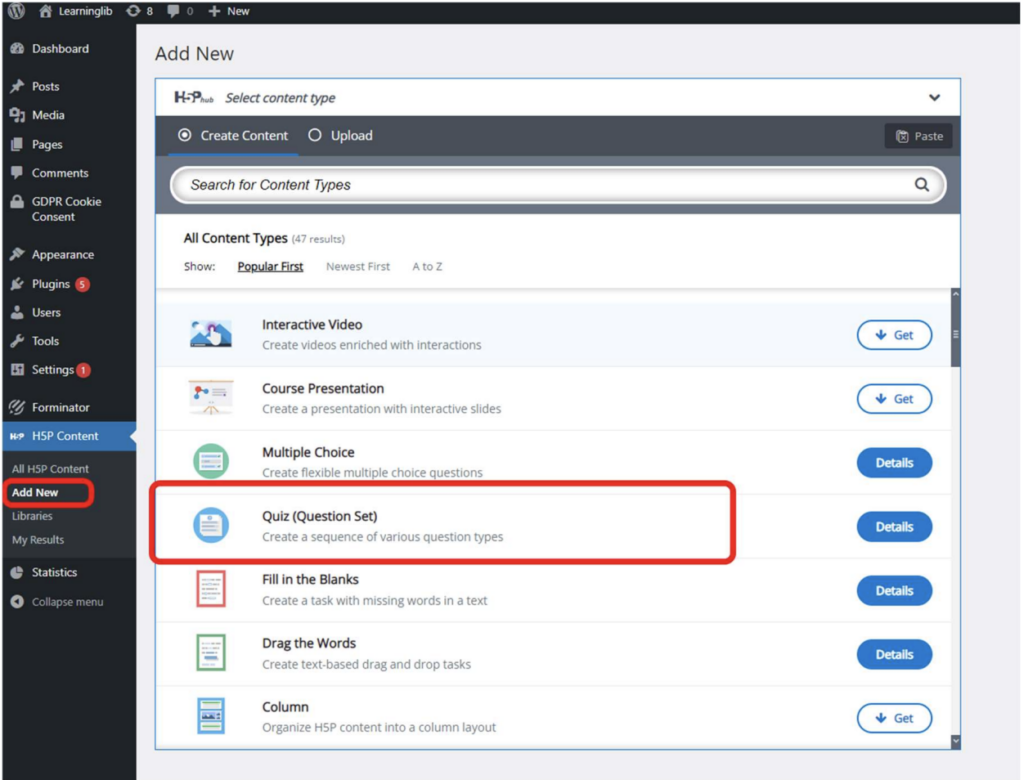
Here we show how you build a quiz, but there are many different H5P options.
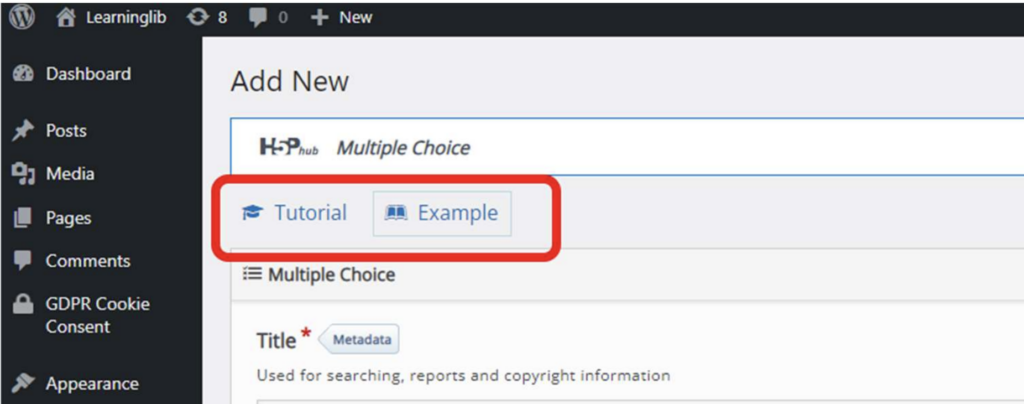
Every time you create a new H5P content type, there are links to a tutorial and an example at the top of the page – there is also a list
of the most important here .
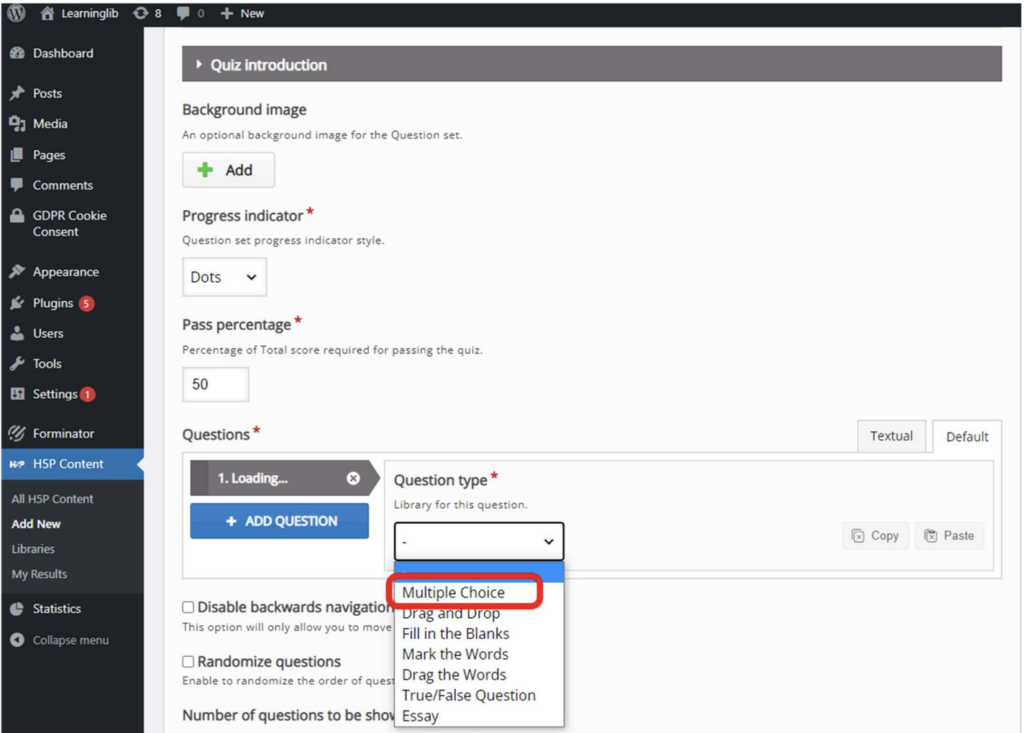
Choose Quiz (Question Set) and give your Quiz (Question Set) a title.

Scroll down to Questions section and choose Question type > Multiple Choice.
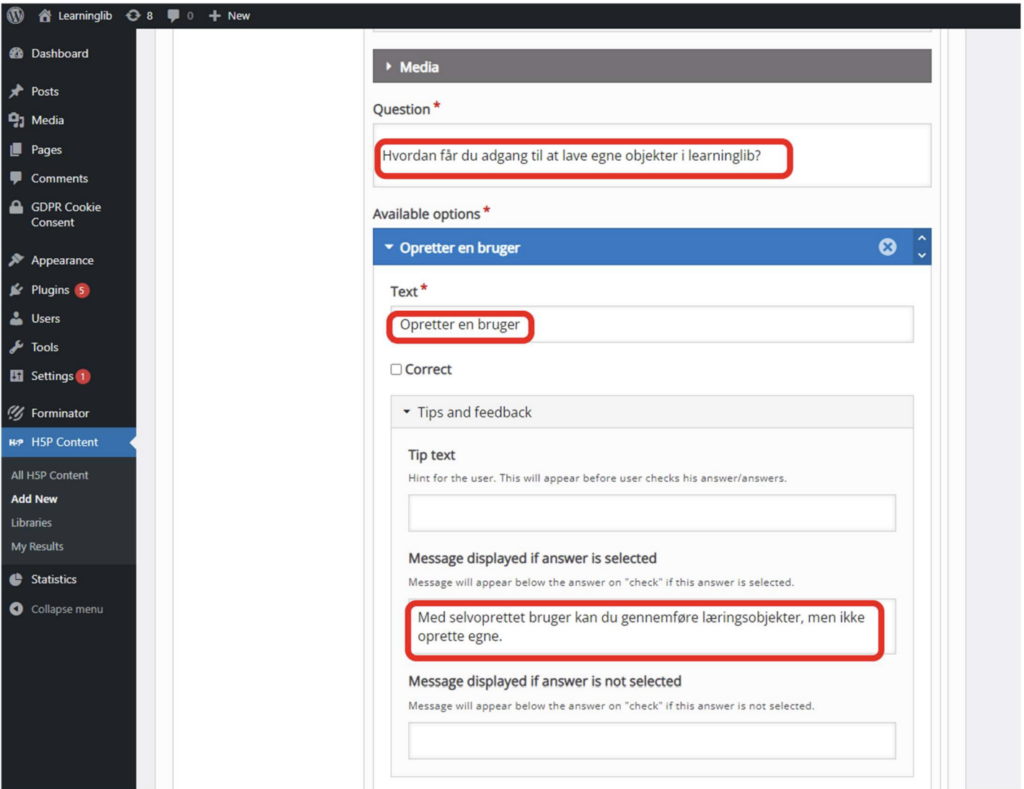
Write your question in the Question field and your answers in the following Text fields. You can add text that
is shown when the user has chosen an answer in Message displayed if answer is selected
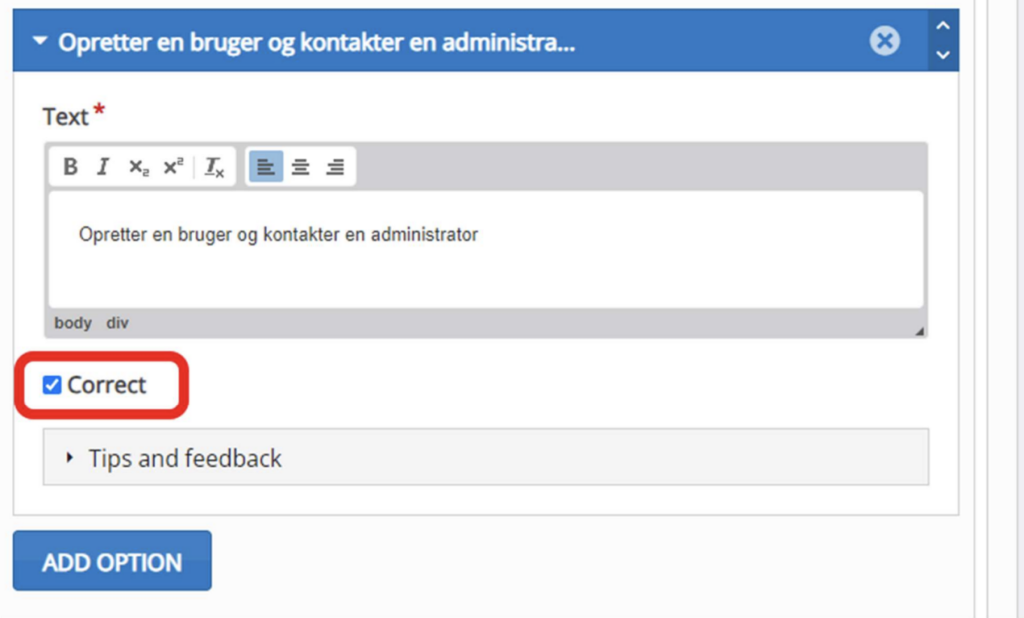
Put a tick under Correct, by the correct answer.
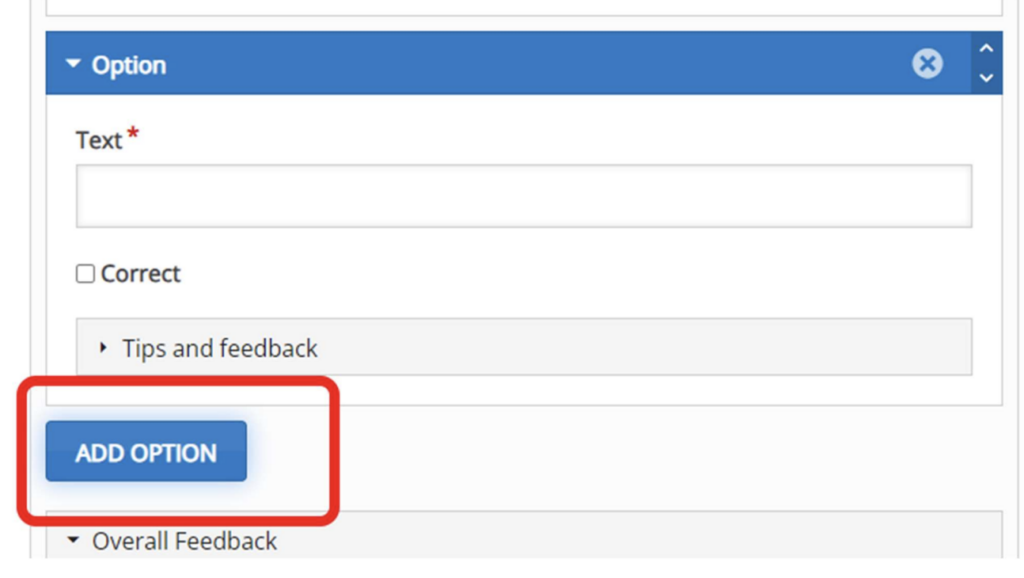
If you need more than two answer options, click Add Option
You can add more questions to the quiz via the Add Question button
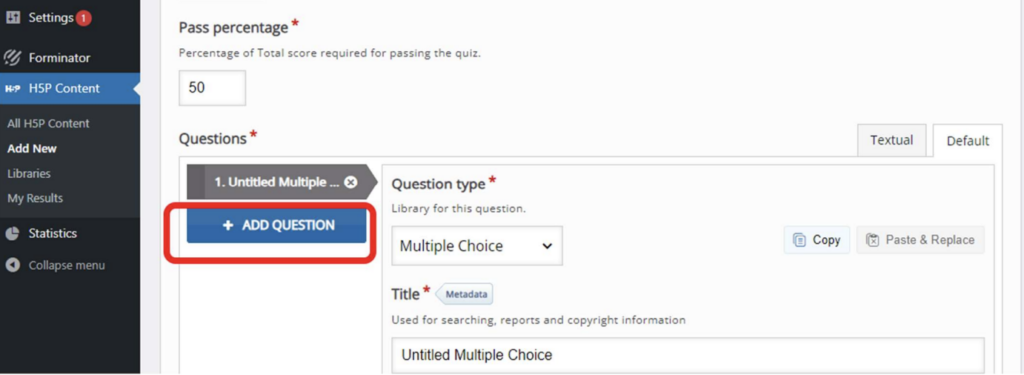
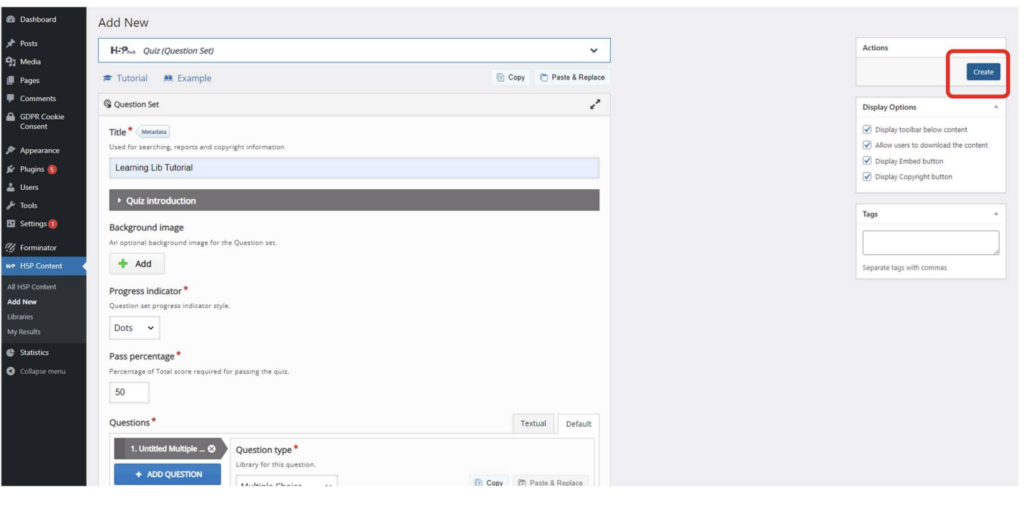
When you have finished the H5P object and want it linked to the learning object you are making, or
if you just want to embed it on an intranet page, scroll up to the top of the page and click Create.
You can then try out your new quiz.
On the right you can see a Shortcode. You need to copy it.
.
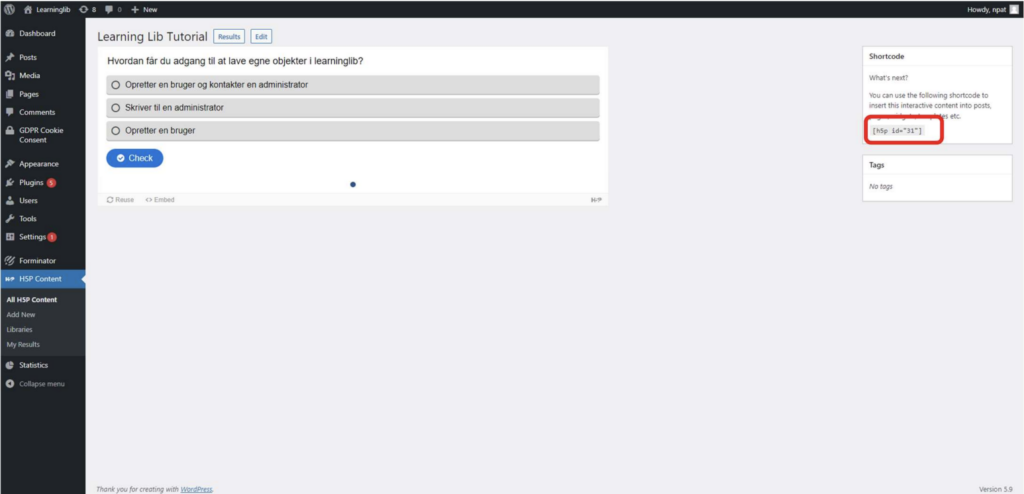
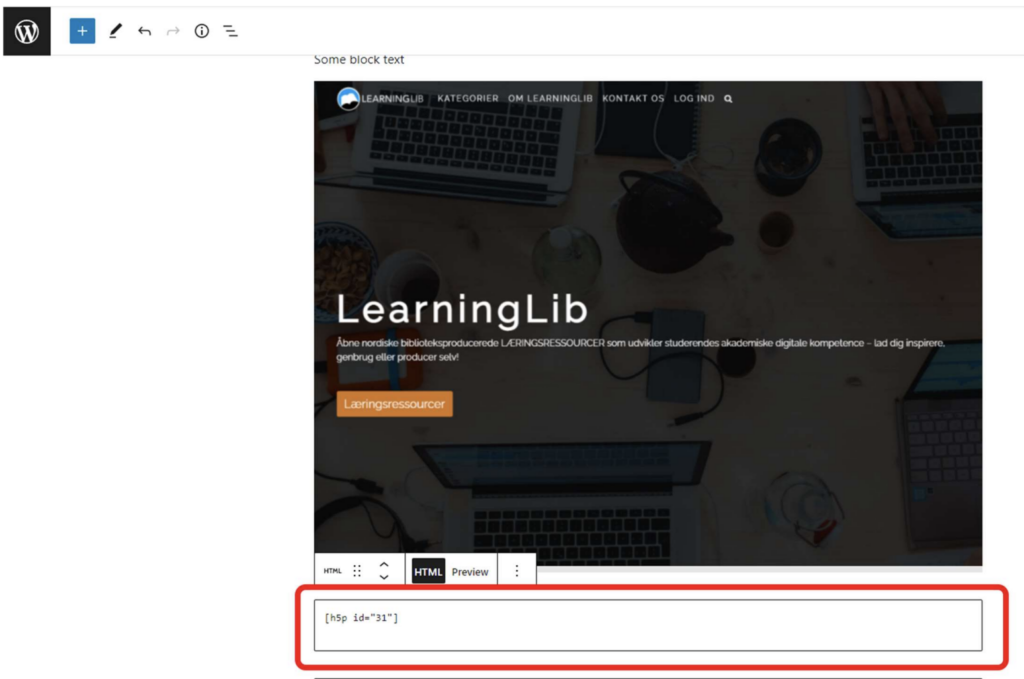
The shortcode you insert into your learning object in the block type called Custom html.
On https://h5p.org/ there are descriptions, examples and tutorials about each H5P content type.
NB: If several of you are making an H5P element, you can edit it at the same time. However, be careful to edit only the elements you have been given permission to, so that you do not change the original where that is not intended. If you want to edit someone else's H5P element without changing the original, you have to ”reuse” it and then edit the copy, which you can use in your own learning object.
Embed objects in LMS’s or LibGuide
You can also embed your H5P elements in places other than your LearningLib learning object, e.g. on an intranet, LMS’s and similar.
Here you can see how to embed H5P in Absalon.
Here is a guide to how you embed H5P in Brightspace (click “Overview of H5P”).
Here is a guide to how you embed an H5P object in LibGuide.
Here is also an overview of some good H5P templates for angling quizzes in different directions, depending on need:
You can see all the H5P templates we can get access to here: H5P – Examples and Downloads.
If you find an H5P template on this page that is not in the H5P catalogue, then contact us and state which template you need.